Setup G-Code generation
[Setup import] [Setup import extensions] [Setup G-Code generation] [Setup Program behavior] [Setup Program apperance]
Back to [GUI] [Menu items]
Settings related to G-Code generation / default parameter
Graphics import - G-Code generation
General parameter
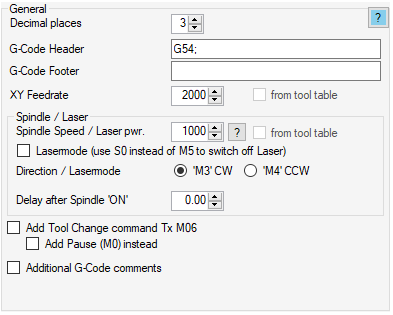
- Decimal places: defines the number of decimal places exported into the G-Code.
Note: too less decimal places could cause error 33 when using G2 / G3 (arc) command. - G-Code Header: apply indivdual code for program start, separate lines with ';'.
Note: some settings are not required due to default status after grbl reset (G0, G54, G17, G90, G94, G21, G40, G49, M0, M5, M9). - G-Code Footer: apply indivdual code for program end, separate lines with ';'.
Note: if you want to move to default position finally, first move the pen upwards, then (new line) move to desired position, e.g.: "Z5;X0Y0". - XY Feedrate: the movement speed, when using G1, G2 or G3 command. Can be overwritten by 'tooltable use'.
Note: grbl will never exceed the speed, set via $110, $111. - Spindle speed: the S value (PWM value), applied to the spindle control command M3 or M4. Can be overwritten by 'tooltable use'.
Note: check also the special grbl Laser Mode. - Lasermode: replaces the M5 spindle off command by M3/M4 S0 command.
- Direction / Lasermode: see above.
- Delay after Spindle 'ON': it is a security wait time, so you have time to reset grbl, before the router starts with spindle off and breaks the milling bit.
- Add Tool Change command Tx M06: adds the tool change command to the G-Code.
Note: the 'M06 command is not supported by gnea/grbl and will be skipped / replaced by grbl-Plotter. - Add Pause (M0) instead: for manual tool change, a M0 command is enough.
- Additional G-Code comments: add some comments to the generated G-Code.
Pen up / down translation
This section defines the generated G-Code for tool (pen) -up/-down movement. Tools could be moved (activated) via Z-axis, RC-Servo, solenoid / relais / power on/off or somehow different (individual).
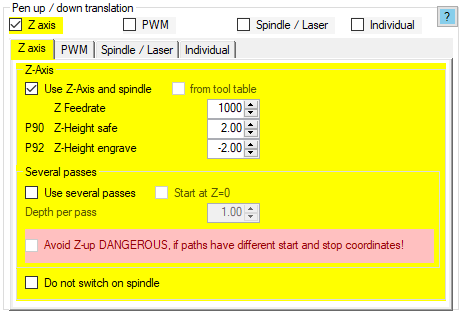
Z axis
- Use Z-axis and spindle: activates the spindle on program start and applies the given Z-axis values for pen-up / -down.
- Z-Feedrate: with this option the graphic objects will be sorted to avoid unneeded moves.
- P90 Z-Height safe: usually a positive value, to move Z above the workpice. P90 is the subroutine number, which could be used inside tool change scripts to perform 'pen-up'.
- P92 Z-Height engrave: usually a negative value to define the engraving depth into the workpice. P92 is the subroutine number, which could be used inside tool change scripts to perform 'pen-down'.
- Use several passes: for weak machines - engrave the figure step by step with increasing depth, until final depth (Z-Height engrave) is reached. After each step, a Z-up will be applied, then move to the start position of the figure, then Z-down to the next step.
- Depth per pass: the increment of depth from one step to the next.
- Avoid Z-up: after one step, directly move to the start position of the figure, then Z-down to the next step.
- Do not switch on spindle: 'activates the spindle on program start' will be skipped.
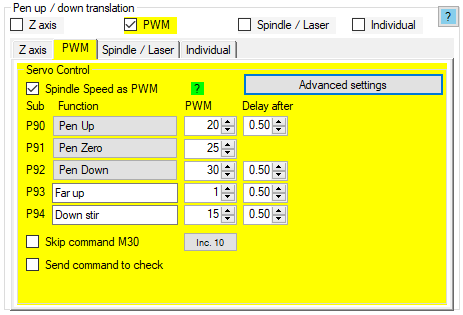
PWM for RC-Servo
Note: a special grbl version is needed to get the correct PWM specifications. The real PWM range is defined via $30/$31!
- Spindle Speed as PWM: with pen-down a M3 / M4 Sxx command will be sent, where xx the given PWM value is.
- P90 to P94: define the PWM values for the corresponding positions.
- Skip command M30: usually the M30 command will be sent on program end, which causes grbl to set M5 (spindle off) which may cause some RC-servos to move to the wrong end position (pen-down).
- Send command to check: if activated, the last changed PWM value will be sent to grbl for real live check..
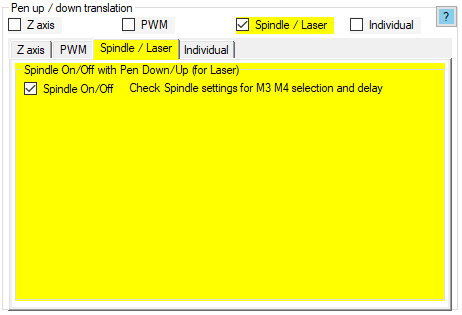
Spindle / Laser
- Spindle On/Off: applies a M3/ M4 Sx on pen-down (x = given spindle speed from the general settings) and a M5 (spindle off) on pen-up.
Note: activate lasermode to replaces the M5 spindle off command by M3/M4 S0 command
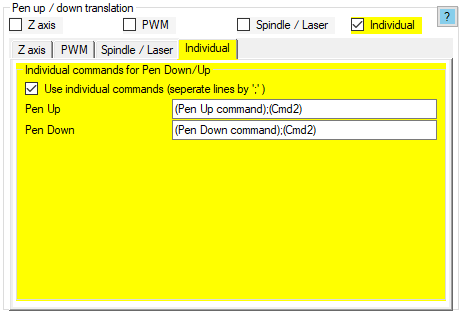
Individual commands
- Pen Up: apply indivdual code for pen-up, separate lines with ';'.
- Pen Down: apply indivdual code for pen-down, separate lines with ';'.
G-Code modification
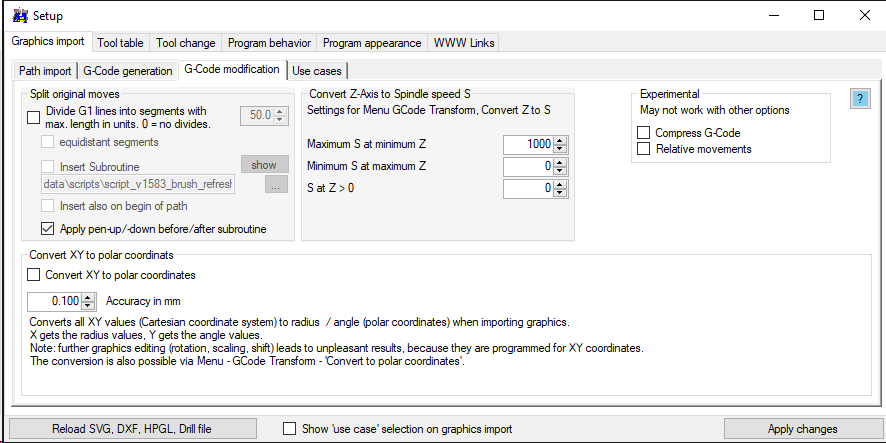
Split original moves
- Divide G1 lines into segments with max. length: given G1 moves will be splitted after given distance to apply script-code e.g. to refresh water-color-brush.
- equidistant segements: G1 move will be splitted into equal distances.
- Insert subroutine: after each line-segment this subroutine will be applied.
- Insert also on begin of path: also apply subroutine at start of the original G1 move.
- Apply pen-up/-down before/after subroutine: .
Convert Z-axis to spindle speed
This is the setup for the transform-item 'Convert Z to S value'.
With this transformation, the G-Code in the editor can be transformend from Z-axis-use to laser-use.
The real PWM range is defined via $30/$31!
- Maximum S at minimum Z: set the S-value for the most negative Z value
- Minimum S at maximum Z: set the S-value for the least negative Z value.
- S at Z > 0: set the S-value for 'pen-up' or laser off.
Experimental
This settings may not work as expected
- Compress G-Code: skips unneded commands, makes the G-Code less readable but may enhances streaming
- Relative movements: Uses G91 (incremental distance mode) instead of G90 (absolute distance mode) command. May cause problems when transforming the G-Code.
Convert XY to polar coordinates
Converts all XY values(cartesian coordinates) to radius/angle values (polar coordinates). X gets the radius values, Y gets the angle values.
This settings are also valid if conversion via [Menu - G-Code Transform] will be performed.
- Accuracy: straight lines will be convertes to curves by short line sections, this value defines the length of the sections
Use case
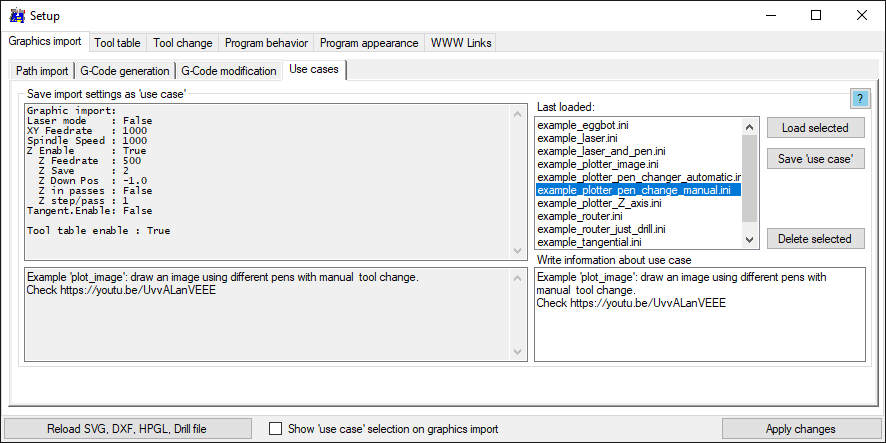
If enabled the use-case dialog opens on each graphics-import.
Use cases contains a reduced amount of saved machine settings (ini-file) to do a quick setup of the settings.
Also a saved machine-setup [Menu - File - Export machine settings] can be used as a use-case, when copied to the usecase folder (check [Menu - About] for the current location).
Tool table

Settings, which are related to specific pen-color or pen-width, if tool table is in use.
Examples: [Laser and Pen] [Manual pen change] [Automatic pen change]
Toolchange
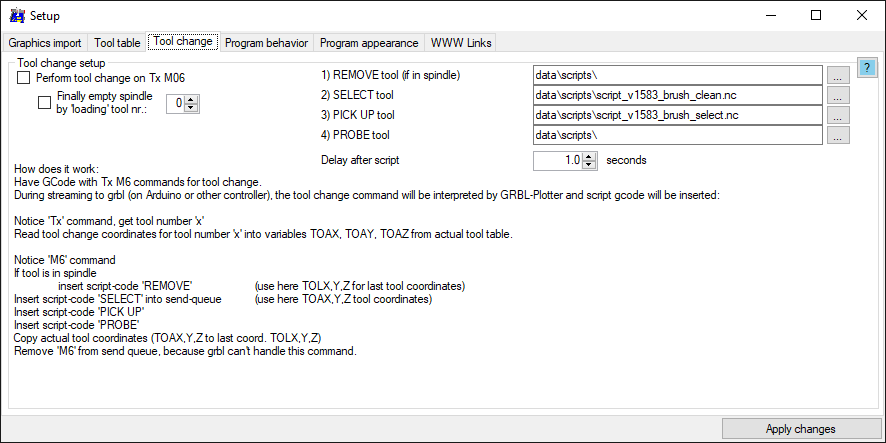
Assign scripts, which will be performed on M06 command. See also 'Automatic pen change'
See also: Tool change how it works