Setup Graphics Import
[Setup import] [Setup import extensions] [Setup G-Code generation] [Setup Program behavior] [Setup Program apperance]
Back to [GUI] [Menu items]
Settings related to import and G-Code generation
Graphics import - Path import - General options
Import parameter

To improove the created G-Code for your needs, e.g. usually a plotter is not accurate to 0.01 mm, so the graphic does not have to be imported that precisely.
- Target units and display: use mm or inch for: graphic conversion, display raster, G-Code command G21/G20
- Number of line segments in curves or splines: the higher the number, the more accurate the representation but also the more data with short moves.
- Avoid G2/3 commands: instead of using the arc-command G2/3, arcs will be created by short line segments. This option will be automatically enabled, when selecting some options.
- Step width on circumfence of arcs: the lower the number, the more accurate the representation but also the more data with short moves..
- Remove very short moves: if a line segment is shorter then the given number it will be skipped.
- Distance to be assumed as equal: if graphic objects have slightly differnent coordinates but should be connected, this parameter helps. E.g. sometimes closed path are not really closed and hatch fill doesn't work.
- Offset graphics to given coordinates: automatically move the lower-left edge of the imported graphic to the given work coordinates.
- Move largest object to the end: move the largest object (area) to the end of the G-Code. Assuming the largest object is the final step to cut out the engraving out of the workpiece.
- Remove largest object: Find lartgest object and remove, e.g. remove surrounding frame or avoid cut out the engraving out of the workpiece.
Sorting properties

Araning of the generated G-Code to minize rapid moves without any tool use.
- Sort objects by shortest connection: with this option the graphic objects will be sorted to avoid unneeded moves.
- Initial start point: set, where to look for the 1st object:
Xmin, Ymax - upper left corner
Xmax, Ymax - upper right corner
Xmax, Ymin - lower right corner
Xmin, Ymin - lower left corner
Xcenter, Ycenter - center of graphic
0;0 - origin of work coordinate
actual pos. - actual tool position - Allow new start point in closed path: find a better start/end point of object to minimize connecting paths
- Largest object last: after sorting - finally move the largest object (area) to the end of the G-Code. Assuming the largest object is the final step to cut out the engraving out of the workpiece.
- Sort the objects by size, largest comes last: sorts from smallest to largest object. Assuming the largest object is the final step to cut out the engraving out of the workpiece.
Output properties

Appearance of the generated G-Code
- Add lines number: start each line with the N-command and line number - not needed for grbl controller.
- Apply text at line end: adds the given text to each line
- Fold code block: the generated G-Code of each imported graphic object is enclosed by XML tags, which can be collapsed.
- Additional import comments: adds extra information to the G-Code for better understanding.
Formate related options
SVG

- DPI setting: if the size of the imported SVG is not ok, perhaps it was stored with an other DPI value.
- Try to resize graphic: automatically resizes the G_Code data to the given number (max. for X or Y dimension)
- Add a frame, logo, sign: imports an additional graphics on every import
- Skip hidden layers and attribute 'fill-opacity=0': usually GRBL-Plotter shows any information found in the SVG
- Apply hatch fill if object is filled: automatically enables the hatch fill option.
- Process meta data: if enabled, the given information in 'description' can be processed.
Note: settings from meta data will be overwritten by tool-table use.
Example keywords:
FeedXY=1234; SpindleSpeed=789; ZEnable; FeedZ=321; ZUp=5; ZDown=-1.2; PWMEnable; PWMUp=10; PWMZero=20; PWMDown=30; LaserEnable;LaserPower=100; SpindleEnable
In this example, the given values this will overwrite the values from the concerning setup page XY feedrate, Z-axis enable, Z-up/-down/-feedrate values:
Example files: Layer_visibility.svg MetaData_Z_axis.svg MetaData_Laser.svg MetaData_Servo_PWM.svg
DXF
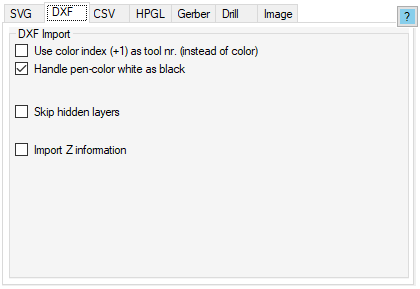
- Use color index (+1) as tool nr.: in DXF format, colors of objects are saved as index, which could be used as tool number.
- Handle pen-color white as black: in LibreCad the default color is white (on black background), which can be imported as black.
- Skip hidden layers: usually grbl_plotter shows any information found in the DXF.
- Import Z information: if possible the Z information can be imported too..
Example file: Layer_visibility.dxf (download file and open from local drive or drag & drop)
CSV
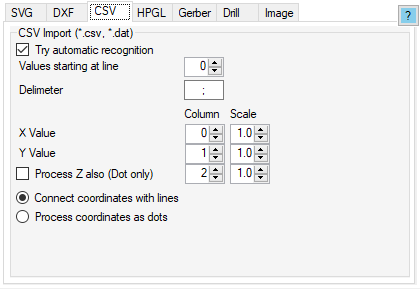
- Try automatic recognition: tries to find automatically the delimeter, first line of data and chooses last column as Y and next-to-last as X value. Otherwise the given values will be taken.
- X/Y/Z Value: select column to extrcat value from and apply a scaling if needed
- Process Z also: also extract depth infomration.
- Connect coordinates with lines: connects the coordinates with move commands.
- Process coordinates as dots: Each coordinate is treated as a hole.
Example file: airfoil profile clarky.dat (download file and open from local drive or drag & drop)
HPGL
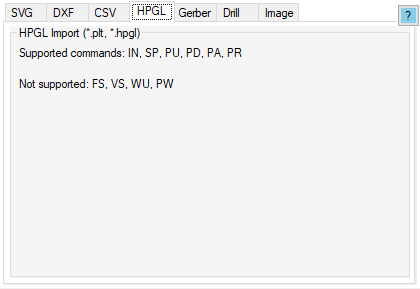
HP-GL Reference Guide
No import options for HPGL,
Supported commands: IN, SP, PU, PD, PA, PR
Not supported: FS, VS, WU, PW
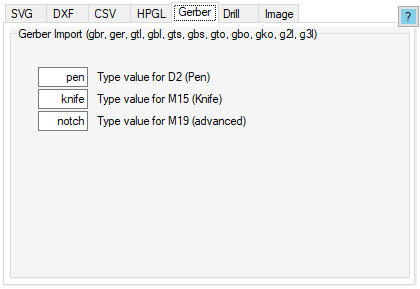
Gerber
Drill

No options
Image

- Layered Image Import: only valid for file-extension '*.pdn-json', generated via PaintDotNet. Copy Plugin 'PdnJsonFileType.dll' to \paint.net....\FileTypes
Automatic vectorization: vectorizes an image in one go, instead of opening the 'Convert Image' form..
- Apply for: select for which file-extension the automatic should be applied, otherwise a new form will open.
- Settings - Background detection: decide how to recognize background: by transparency or by brightness threshold
- Settings - Size: choose the resulting vector size: calculated by image DPI, by fix DPI or set the final vector-width in mm
- Settings - Vectorization algorithm: Choose between Po Trace or Geometric Trace
Path interpretation
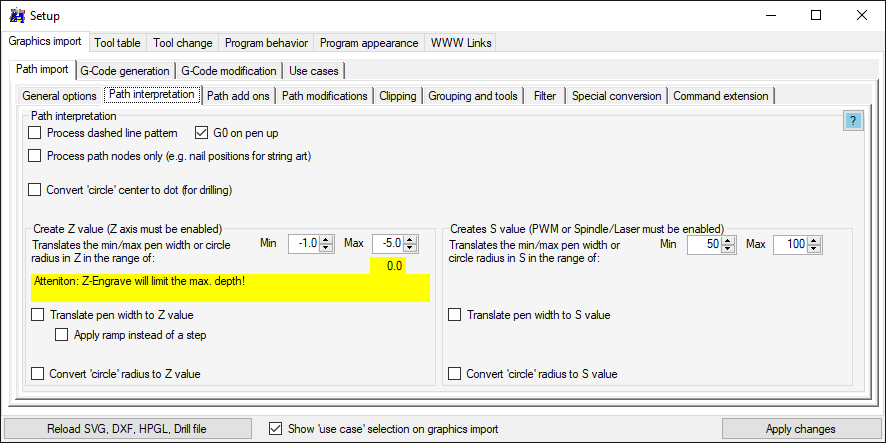
- Process dashed line pattern: apply line pattern to G-Code,
if enabled, use G0 command on gaps. - Process path nodes only: just do a pen down/up on given positions to drill holes or draw dots.
- Convert 'circle' center to dot: take circle center as position for holes or dots..
- Translate pen width to Z/S value: interpret pen width of objects as Z or S value in the given range.
Note: if only one width is found, the minimum value will be used. - Convert 'circle' radius to Z/S value: interpret circle radius as Z or S value in the given range.
Note: if only one radius-size is found, the minimum value will be used.
Path addons
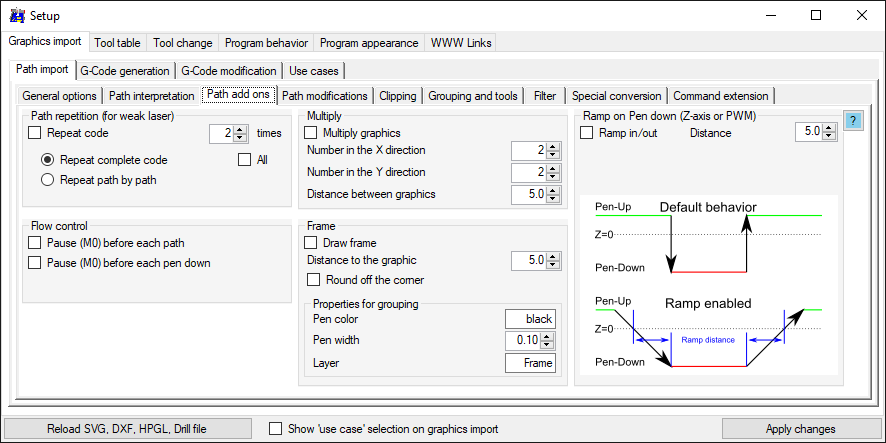
- Path repitition: repeats the code - the complete program or object by object.
- Multiply: creates copies of the imported objets in X and Y direction.
- Frame: draws a frame around all objects - for curring or decoration.
Example 'Frame and multiply' - Ramp on Pen down/up: to avoid pen artefacts (ink feathering).
Example: YouTube 'mitxela Plotterfun and GRBL-Plotter: Easter bunny in the sunset' at 6:38 - Flow control: adds a pause command for pen / tool change.
Path modifications
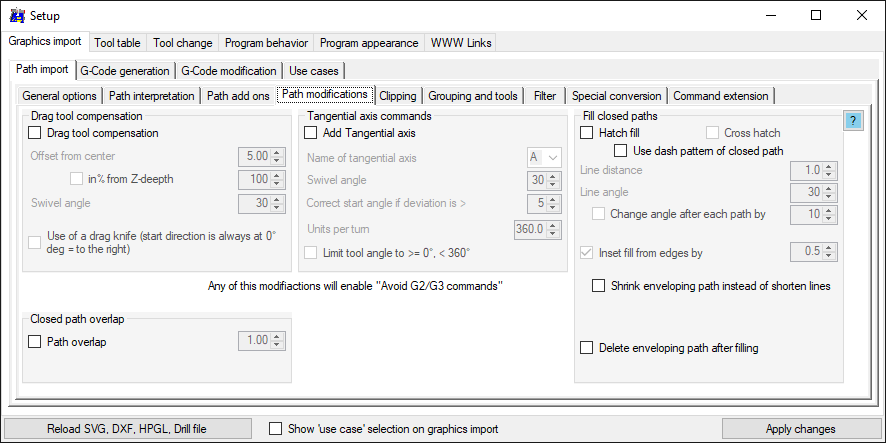
- Drag tool compensation: Example 'Drag tool compensation'
- Tangential axis: Example 'Tangential axis'
- Fill closed path: Example 'Hatch fill'
- Closed path overlap: Example 'Path overlap'
Clipping / Tiling
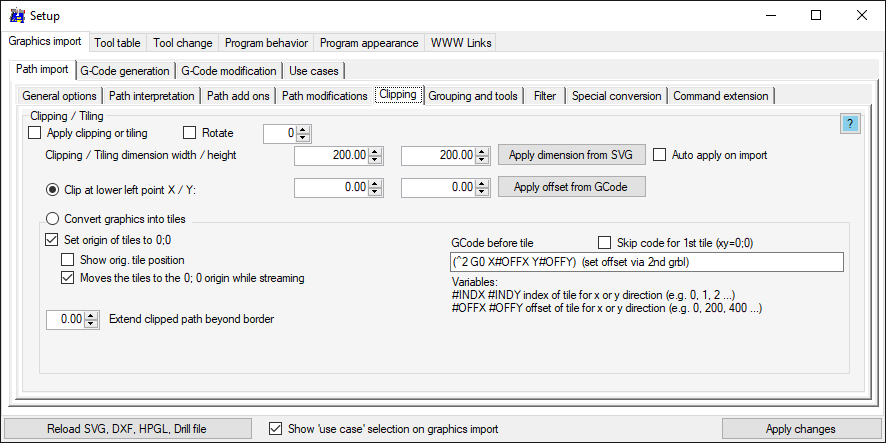
- Rotate: rotate graphics before clipping or tiling, if needed
- Clipping: only process a selected area of the imported graphics. Set offset and range.
SVG only 'Auto ': sets width and height from SVG width and height. - Tiling: divide the graphics into tiles and process them one by one, apply commands before a tile to feed the material.
Grouping

Group objects of same property: all figures with same selected property will be grouped.
The groups will be sorted in the selected order.
This is usefull for tool / pen change or cleaning up drawings.
Tool table
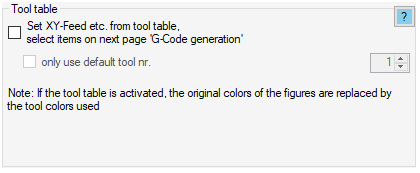
Set XY-Feed etc. from tool table: if enabled and information available in the selected tool-table, the selected settings will be overwritten by the tool-table values.
Example: selected properties to overwrite:
Properties from the actual tool table, which will be applied:

Conversion
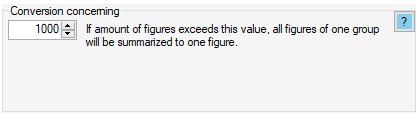
After importing a graphic and applying all import options (before grouping the figures), the amount of figures will be checked. If the given value is exceeded, the single figures will not be surrounded by XML-tags to avoid time consuming display operations. The consequence is, that the single figures can't be selected in the 2D-View for further operations.
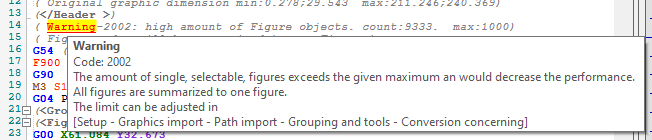
If limit was exceeded, a message appers in the imported G-Code:
Filter
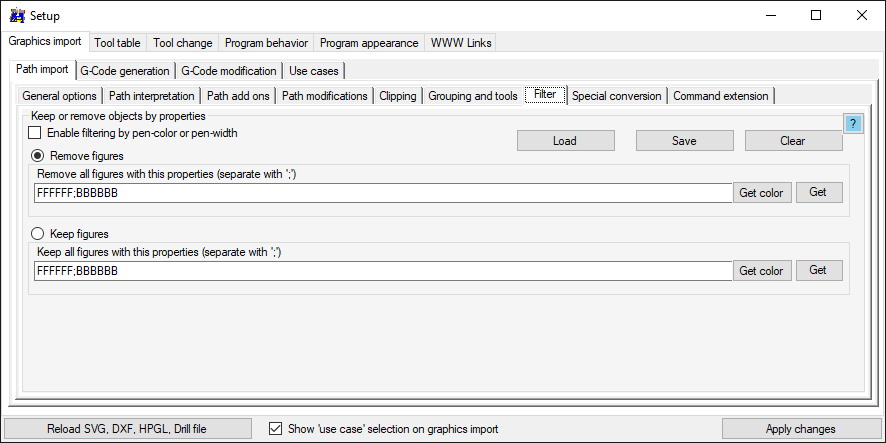
The idea of the filter is, to remove objects before further processing.
- Remove figures: figures with the listed colors or pen-widths will be removed.
- Keep figures: figures with the listed colors or pen-widths will be kept (others will be removed).
Example: YouTube 'OpenStreetMap' at 4:20